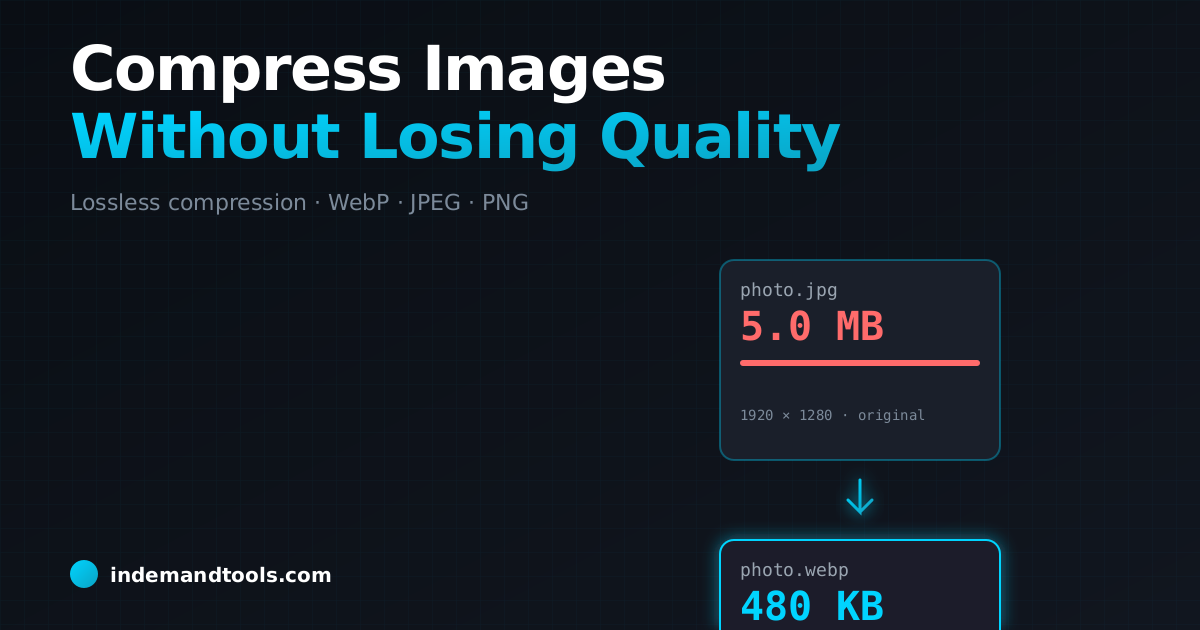

Page weight kills conversions. Google research shows a bounce-rate increase of 32% when load time goes from 1 to 3 seconds, and images account for roughly half of the average page payload. The good news: you can routinely cut image weight by 60-80% with zero visible quality loss, if you understand which format to use, which compression algorithm to apply, and which settings actually matter. This guide walks through every step, browser-based and free.
How do you compress an image without losing quality?
To compress an image without visible quality loss, pick the right format for the content (JPG for photos, PNG for graphics with transparency, WebP for both), then apply lossy compression at quality 75-85 for photos or lossless optimization for graphics. A free browser-based tool like InDemand Tools Image Compressor can typically reduce a JPG by 60-70% and a PNG by 30-50% with no perceptible difference on screen. Always strip EXIF metadata for an extra 10-30 KB per image.
How to compress an image in 60 seconds
- Open a browser-based compressor. Load our Image Compressor. The tool runs entirely in your browser, your images are never uploaded to a server.
- Drag and drop your image. Single file or batch. JPG, PNG, WebP, and GIF are all supported.
- Set quality to 80. For photos this is the sweet spot. Virtually identical to the original on screen, typically 60-70% smaller.
- Download. The compressed file replaces the original in your downloads folder.
If you need pixel-perfect control (responsive images, multiple sizes, modern format fallbacks), drop into a build-step pipeline like sharp in Node or imagemin. For everything else, the browser tool is faster.
Lossy vs lossless: which should you use?
Lossy compression discards visual data the human eye is unlikely to notice, subtle gradients, fine high-frequency detail. The trade is dramatic: a JPG at quality 80 is typically 5-10x smaller than the original PNG, with no visible difference at normal viewing distance.
Lossless compression rearranges the file's bytes so the same pixel data takes less space. The decompressed image is bit-identical to the original. Savings are smaller, typically 20-50% for PNG, almost nothing for already-compressed JPGs.
| Use case | Lossy or lossless | Recommended format |
|---|---|---|
| Photo on a marketing page | Lossy, quality 80 | WebP or JPG |
| Logo with transparency | Lossless | PNG or WebP |
| Screenshot of a UI | Lossless | PNG or WebP |
| Product photo in an e-commerce gallery | Lossy, quality 85 | WebP with JPG fallback |
| Icon set | Lossless (or SVG) | SVG, PNG fallback |
| Photographic hero image | Lossy, quality 75 | AVIF with WebP fallback |
| Print at 300 DPI | Lossless | TIFF or PNG |
JPG vs PNG vs WebP vs AVIF. The real differences
| Format | Best for | Transparency | Animation | Browser support | Typical size vs JPG |
|---|---|---|---|---|---|
| JPG | Photos | No | No | Universal | 100% (baseline) |
| PNG-8 | Simple graphics, <256 colors | Yes | No | Universal | 200-400% |
| PNG-24 | Graphics with smooth gradients | Yes | No | Universal | 400-800% |
| WebP | Photos and graphics | Yes | Yes | 97%+ globally | 60-75% |
| AVIF | Photos (best compression) | Yes | Yes | 92%+ globally | 40-55% |
| SVG | Logos, icons, illustrations | Yes | Yes | Universal | Highly variable |
Practical guidance: in 2026, WebP is the default for both photos and graphics. AVIF gives even better compression but encodes 5-10x slower and is still missing on some legacy browsers. Use the <picture> element to serve AVIF, fall back to WebP, then to JPG, that pattern is now table stakes for fast-loading sites.
What quality setting should you use?
The default quality slider in every encoder lies. Quality 100 is almost never the right answer for the web, it produces a file 2-3x larger than quality 90 with no visible improvement. The defensible range:
- Quality 90-95: photographic hero images you have studied closely, art-quality reproductions
- Quality 80-85: default for all content imagery on a marketing site or blog
- Quality 70-75: thumbnails and below-the-fold imagery where the user is unlikely to inspect closely
- Quality 60 and below: only when bandwidth is genuinely scarce. Visible artifacts appear here
Run an A/B comparison on a representative photo before locking in your setting. The right number depends on the image content: photos with smooth skin and gradients show JPG artifacts earlier than busy scenes with foliage or texture.
Strip metadata — the easy 10-30 KB win
Every photo from a phone or DSLR carries EXIF metadata: camera model, lens, GPS coordinates, exposure settings, timestamp, and sometimes a thumbnail of the image embedded inside the file. None of this is visible to the user. All of it adds 5-50 KB per file and may leak the photo's location and the device that took it.
Strip it. Every browser-based compressor and every CLI optimizer (jpegoptim, oxipng, imagemin) removes EXIF by default. If you converted to Base64 for inline use, paste the data URL into our image-to-base64 converter to validate the size, bloated Base64 strings often hide unstripped metadata.
Responsive images. Serve the right size to each device
A 4000×3000 photo is wasted on a phone displaying it at 400 pixels wide. Generate multiple sizes (typically 400w, 800w, 1200w, 1600w, 2000w) and serve them with the srcset attribute:
<img
  src="hero-800w.webp"
  srcset="hero-400w.webp 400w, hero-800w.webp 800w, hero-1600w.webp 1600w"
  sizes="(max-width: 600px) 100vw, 50vw"
  alt="Product hero shot"
  width="1600" height="900"
  loading="lazy"
/>
Three rules you must follow: declare width and height attributes (prevents Cumulative Layout Shift), set loading="lazy" on below-fold images (saves bandwidth on initial load), and use fetchpriority="high" on the LCP image (improves Largest Contentful Paint).
Favicons and small icons are a special case
Browser favicons need to display crisply at 16×16, 32×32, 180×180, and 512×512 pixels. A single PNG scaled by the browser blurs at small sizes. The right approach is to generate a full set with a favicon generator that produces hand-tuned bitmaps at each required size plus an .ico with multiple resolutions embedded and an SVG variant for modern browsers.
How to batch-compress hundreds of images
For routine workflows the browser tool handles 50-100 images comfortably. For larger jobs (a product catalog of 1000+ photos, a photographer's archive), drop into a CLI:
- jpegoptim, lossy and lossless JPG compression, strips EXIF by default
- oxipng, modern PNG optimizer, much faster than the original pngcrush
- cwebp. Google's official WebP encoder
- avifenc — official AVIF encoder, slow but excellent compression
- sharp (Node.js), for build pipelines and serverless image processing
Wrap them in a shell loop or a build-step script. Most CI pipelines now optimize images automatically on every push.
Frequently Asked Questions
Does compressing an image multiple times reduce quality each time?
Yes for lossy formats. Every JPG save discards a little more data, and the artifacts compound. Never edit and re-save a JPG repeatedly. Edit a PNG or TIFF master, then export to JPG once at the end.
What is the difference between optimization and compression?
Compression reduces file size by encoding the data more efficiently or discarding visual detail. Optimization is the broader workflow: pick the right format, the right dimensions, strip metadata, and apply the right compression. Optimization without compression rarely beats compression alone.
Will compressing images hurt my SEO?
The opposite, compressed images load faster, which improves Largest Contentful Paint and Cumulative Layout Shift, both Core Web Vitals signals Google uses for ranking. As long as quality stays above 75 the visual difference is invisible to users and search engines alike.
Can I compress an image without uploading it anywhere?
Yes. Any client-side browser tool — including ours. Performs the compression entirely in your browser using the Canvas API and WebAssembly encoders. No bytes are sent to a server. This is the safest option for sensitive or unpublished images.
Why is my PNG bigger than my JPG?
PNG is lossless and stores every pixel exactly, so for a complex photo it is typically 4-8x larger than a quality-80 JPG of the same image. Save photos as JPG or WebP; reserve PNG for graphics, screenshots, and anything needing transparency.
Does WebP work in Safari?
Yes, Safari 14+ (iOS 14+, macOS Big Sur+) supports WebP. As of 2026 that covers 97%+ of global traffic. Use a <picture> element with a JPG fallback to catch the remainder.
The bottom line
Choose the right format (WebP for almost everything), apply lossy compression at quality 80 for photos and lossless for graphics, strip metadata, generate responsive sizes with srcset, and you will routinely shave 60-80% off your page weight without a single user noticing. For a single image or a batch of 50, a browser-based tool gets you there in under a minute.
Sources: web.dev image optimization guide (Google), Mozilla MDN image performance documentation, Cloudinary State of Visual Media Report, Can I Use browser support data, ImageMagick and libvips benchmarks.
Last updated: 21 May 2026